
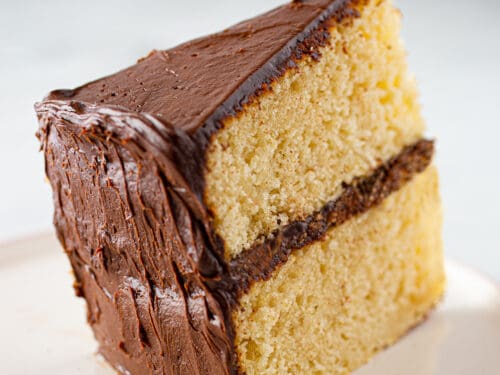
Yellow Cake with Chocolate Frosting Step by Step Guide: It’s the cake of birthday dreams—yellow with chocolate frosting! An enticing brown butter milk chocolate frosting coats each tender and delicious cake tier. Add some confetti sprinkles to the cake’s finish for a unique celebration!
A traditional treat like this yellow birthday cake is always a good choice! But the easiest recipes are frequently the hardest to perfect so that the flavor and texture truly wow guests. And if there’s one thing I absolutely adore doing, it’s improving upon my previous recipes!
Yellow Cake with Chocolate Frosting: A Step-by-Step Guide
INGREDIENTS
For the yellow cake:
- 210 g (1 ¾ cups) all-purpose flour
- 162 g (¾ cup + 1 tbsp) granulated sugar
- 2 teaspoons of baking powder
- ½ teaspoon kosher salt
- 76 g (5 ½ tablespoon) unsalted butter, room temperature
- 50 g (¼ cup) neutral oil
- 227 g (1 cup) buttermilk, room temperature
- 1 egg, room temp
- 2 teaspoon vanilla extract
For the brown butter milk chocolate frosting:
- 227 g(16 tablespoon) unsalted butter
- 340 g(12 oz) milk chocolate
- 170 g(¾ cup) heavy cream
- 113 g(1 cup) powdered sugar, sifted
- 21 g(¼ cup) Dutch-process cocoa powder, sifted
- ½ teaspoonkosher salt
- 2 teaspoons of vanilla extract
- confetti sprinkles, for topping
INSTRUCTIONS
Regarding the yellow cake:
- Set the oven’s temperature to 325°F, or 160°C. Three 6-inch cake pans should be greased and lined with parchment paper.
- Mix the flour, sugar, baking powder, and salt in the bowl of a stand mixer that has been equipped with the paddle attachment.
- Add the butter, which has been cut into small cubes, to the dry ingredients. Mix slowly until the consistency of wet sand is achieved.
Incorporate the oil, buttermilk, egg, and vanilla, blending until thoroughly blended.
- Split the cake mixture among the ready pans.
- Once a toothpick is inserted, bake for 22 to 25 minutes, or until it comes out clean. Transfer the cakes right away to a wire rack to finish cooling.
- Before decorating, freeze the cakes after they have cooled and wrap them in plastic wrap. (Frosting frozen cake layers will be a lot simpler!)
NUTRITION FACTS
- Serving: 1slice | Calories: 587kcal | Carbohydrates: 56g | Protein: 5g | Fat: 41g | Saturated Fat: 23g | Polyunsaturated Fat: 4g | Monounsaturated Fat: 11g | Trans Fat: 1g | Cholesterol: 86mg | Sodium: 302mg | Potassium: 180mg | Fiber: 3g | Sugar: 39g | Vitamin A: 890IU | Vitamin C: 0.1mg | Calcium: 91mg | Iron: 2mg
NOTES
- Use cake strips to create flat cake layers. Soak these wilton cake strips in ice water before starting the cake batter. Just before baking, wrap the cake strips around the pan. The cold temperature on the outside of the cake will prevent the edges from baking faster than the center, resulting in an evenly baked, flat cake.
- Freeze the cake layers before decorating. Since this is such a moist cake, I highly recommend freezing the cake layers for at least two hours before decorating.
- If the frosting is chilled overnight. microwave it in 10 second increments until it softens up, then use an electric mixer to beat on low speed until smooth.
- Use a cookie scoop to assemble the cake. Use a 3-ounce cookie scoop to add an equal amount of frosting to each layer.
FAQs AND QUESTIONS
HOW TO BAKE A FLAT CAKE LAYER.
- Because the perimeter bakes more quickly than the center, giving the core more time to rise, cakes may develop a dome in the middle while they bake. Because it is inconvenient to have to clip off the top of the cake, this is not the best method for layering cakes.
- Using cake strips is the best technique to make sure your cake layers bake up flat rather than doming. Before wrapping the cake strips around the outside of the cake pan, soak them in cold water. By doing this, you can make sure that the cake bakes evenly and flatly by preventing the outside from baking more quickly than the center.